Explaination
This part shows the developments of this project at each stage from proposal to final demo through gifs and photos.
Step 1. Replace Rasberry Pi 3/4 with RP2040 to Drive Servo Motors & Assemble Robotic Arm
The compatible micro controller of this hat is Raspberry Pi 3/4. Since the pins of Raspberry Pi 3/4 and Raspberry Pi Pico are not compatible, it is necessary to reconnect the circuit according to the circuit diagram in the data package.The programming method of Raspberry Pi Pico is also different from that of Raspberry Pi 3/4, so the corresponding program needs to be modified.Using a Raspberry Pico instead of a Raspberry Pi 3/4 is doable, but takes more time.

Step 2. Assemble the robotic arm and use RP2040 to Control
- After driving the servo motors successfully by RP2040, it’s time to assemble the robotic arm kit and try to use RP2040 to control it.
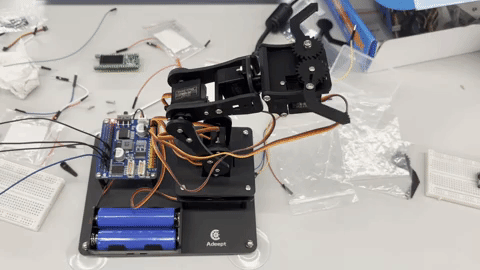
- To ensure that the robotic arm moves smoothly and in a harmonious way, I leanred the operating range of each servo motors and make them working together.And to simplify the trace of motion, I cut the # of servo motors from five to three. Thus, there is one servo motor controling horizontal movements while other two servo motors working together to control vertical movements.
| Number of servo (Channel #) | Move Range (degree) | Initial State (degree) | Direction |
|---|---|---|---|
| Channel (0) | 15 - 145 | 80 | horizontal |
| Channel (1) | 20 - 160 | 140 | vertical |
| Channel (2) | 40 - 180 | 160 | vertical |
- The code to realize the Channel 1 and Channel 2 working together is showing below:
# up
def up():
    global servo1
    global servo2
    if (servo1 > 100 and servo2 > 120):
        servo1 -= 1
        servo2 -= 1
    set_angle(1, servo1)
    set_angle(2, servo2)
    time.sleep(0.03)

# down
def down():
    global servo1
    global servo2
    if (servo1 < 160 and servo2 < 180):
        servo1 += 1
        servo2 += 1
    set_angle(1, servo1)
    set_angle(2, servo2)
    time.sleep(0.03)
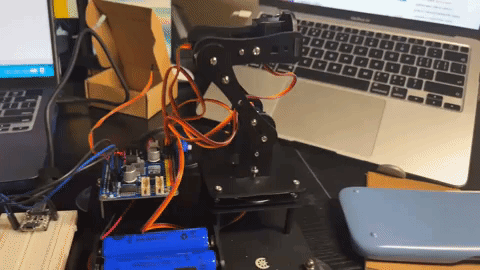
- And then the final presentation:
Step 3. Object Detection
PICO4 ML is applied to realize object detection as it has integrated camera and LCD modules on itself. So first of all, I’d like to introduce the parameter of the camera module (hm01b0 datasheet), which is an Ultra Low Power Image Sensor (ULPIS) that enables the integration of an “Always-on” camera for computer vision applications such as gestures, intelligent ambient light and proximity sensing, tracking and object identification.
And if we want to detect specific objects throught PICO4, there are two ideas coming up to my mind: one is finding a LED and another one is finding a specific pattern. Then we first started with the former idea, to find a LED in the view, which is really cool and easy to realize. Moreover, I designed serveral algorithums to realize this idea such as: calculating the weighted average location coordinate of the brightest point, counting the number of brightest points in each area in the view and finding the middle point of the brightest area.
Example Code:
// Weighted Average Method
        if (x_weight < 25){
            if (y_weight < 50){ areaCounter[0][0]++;}
            else if (y_weight >= 50 && y_weight < 110){ areaCounter[1][0]++;}
            else if (y_weight >= 110 && y_weight < 160){ areaCounter[2][0]++;}
        } else if (x_weight >= 25 && x_weight < 55){
            if (y_weight < 50){ areaCounter[0][1]++;}
            else if (y_weight >= 50 && y_weight < 110){ areaCounter[1][1]++;}
            else if (y_weight >= 110 && y_weight < 160){ areaCounter[2][1]++;}
        } else if (x_weight >= 55 && x_weight < 80){
            if (y_weight < 50){ areaCounter[0][2]++;}
            else if (y_weight >= 50 && y_weight < 110){ areaCounter[1][2]++;}
            else if (y_weight >= 110 && y_weight < 160){ areaCounter[2][2]++;}
        }

        x_weight /= counter;
        y_weight /= counter;

        xWeight[flag] = x_weight;
        yWeight[flag] = y_weight;

        flag++;
// Counter Method
        if (imageRGB == 65535){
            displayBuf[index++] = (uint8_t)(0xF800 >> 8) & 0xFF;
            displayBuf[index++] = (uint8_t)(0xF800)&0xFF;
            counter ++;
            if (x < 25){
                if (y < 50){ areaCounter[0][0]++;}
                else if (y >= 50 && y < 110){ areaCounter[1][0]++;}
                else if (y >= 110 && y < 160){ areaCounter[2][0]++;}
            } else if (x >= 25 && x < 55){
                if (y < 50){ areaCounter[0][1]++;}
                else if (y >= 50 && y < 110){ areaCounter[1][1]++;}
                else if (y >= 110 && y < 160){ areaCounter[2][1]++;}
            } else if (x >= 55 && x < 80){
                if (y < 50){ areaCounter[0][2]++;}
                else if (y >= 50 && y < 110){ areaCounter[1][2]++;}
                else if (y >= 110 && y < 160){ areaCounter[2][2]++;}
            }
        } else{
            displayBuf[index++] = (uint8_t)(imageRGB >> 8) & 0xFF;
            displayBuf[index++] = (uint8_t)(imageRGB)&0xFF;}
The presentation of object detection:
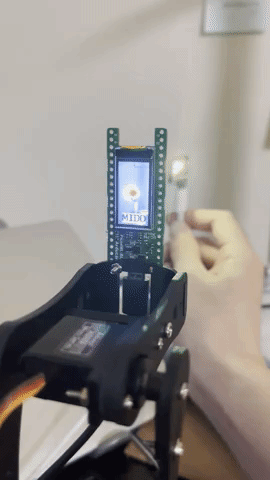
In this part, I met a lot of issues and the most important one was that in a high light level environment, the camera reads every bright things or even objects which are able to reflect light as white things (the camera only read grey value from 0 to 255). And this problem was solved successfully in Part 3!
Step 4. Combine Robotic Arm with PICO4 ML
There are serveral tasks needing to be concerned:
- Fix the PICO4 ML on the end of robotic arm.
- Communication between RP2040 and PICO4 ML.
- Power supply of MCU.
Final combination:

Step 5. Mutiple Tests & Implemetation
There were still a lot of work to implement although the combination of CV and robotic arm was basically realized. For example, the motion design of robotic arm (to make it move smoothly and in specific trace), the image processing issue (exposure gain?), increasing the demo’s ornamental and so on. These problems will be introduced in detail in next part. And the final work is showing below:
